Cart
Your shopping cart is empty!
It's never too late to fix it :)
A custom racket can feel incredible - or completely wrong - after one session. The difference usually comes down to matching the blade, rubbers, and total setup to the way you actually play, not the way you wish you played. If you're learning how to build a custom racket for table tennis, the goal is simple: create a setup that gives you the right balance of speed, spin, control, and confidence under pressure.
A good premade racket has its place, especially for beginners moving up from recreational gear. But once you're playing club matches, training regularly, or developing a clear style, a custom setup gives you far more control over performance.
The biggest advantage is precision. You can choose a blade with the right flex, stiffness, and feel, then pair it with rubbers that support your serve, receive, looping, blocking, or short game. That matters because two players with similar ratings can still need completely different rackets. A close-to-the-table blocker and a forehand-dominant looper should not be building from the same template.
There is a trade-off, though. More choice means more ways to get it wrong. Many players overspec their first custom build and end up with a setup that feels fast in warm-up but unstable in match play.
Before picking anything, be honest about your level and what wins you points. This is the part players skip, and it usually costs them money.
If your game is based on topspin from both wings, you will usually want an offensive blade and rubbers with enough grip and sponge response to arc the ball confidently. If you rely on placement, blocking, and consistency, a slightly slower and more controlled build often performs better over five sets. If you're still developing technique, extra dwell time and forgiveness matter more than headline speed.
Think about distance from the table too. Close-to-the-table attackers often prefer direct response and crisp contact. Mid-distance loopers may benefit from more catapult and a blade-rubber combination that helps generate depth without overswinging.
The blade is the foundation of the racket. It defines the core feel in the hand and at contact, and every rubber choice sits on top of that.
For most players, the first decision is all-wood versus composite. An all-wood blade usually gives better touch, more dwell, and a more linear response. That makes it a strong option for developing players, allround attackers, and anyone who values short game control. Composite blades, especially those with carbon layers, are typically faster, crisper, and more stable on powerful shots. They can be excellent for advanced attacking play, but they also reduce margin if your timing is inconsistent.
Blade speed ratings can help, but they are not universal across brands. OFF-, OFF, and OFF+ tell part of the story. So do thickness, outer ply composition, and handle shape. A limba outer can feel softer and more spin-friendly, while koto often feels harder and more direct. Handle comfort matters more than many players think because a racket that never quite sits right in the hand will affect confidence on every point.
If you're building your first serious setup, a controlled offensive blade is usually the smartest place to start. It leaves enough headroom to attack but does not punish you on receive and touch play.
This is where most of the personality of the racket comes from. Rubber choice affects throw angle, grip, pace, touch, and how much effort you need to produce quality shots.
Start by deciding whether you want the same rubber on both sides. Some players do, especially if they value consistency between forehand and backhand. Others need different characteristics. A common example is a stronger forehand with a harder, more spin-oriented rubber and a backhand with a slightly softer or more controlled option for quicker timing.
Hardness matters, but only in context. A hard rubber on a stiff carbon blade can feel extremely direct and powerful, yet demanding. The same rubber on a softer all-wood blade may feel more manageable. Softer rubbers are often easier to engage and more forgiving in passive shots, but they can bottom out under stronger impact depending on level and technique.
Thickness is just as important. Max or near-max sponge can deliver more pace and spin, but it also raises the sensitivity in serve receive and short play. For many intermediate players, slightly thinner sponge on the backhand can improve control without making the racket feel defensive.
Tacky versus grippy is another real choice. Tacky topsheets can reward brushing contact and spin-heavy technique, especially on serve and opening loops. Grippy European and Japanese-style tensors often offer more dynamic rebound and easier pace. Neither is universally better. It depends on your stroke mechanics and what kind of contact you trust in matches.
The best custom racket is not the one with the highest speed rating. It is the one that lets you execute your game under pressure.
That means considering total weight and balance point. A heavy head-loaded setup may produce a bigger ball, but it can also slow your transition on backhand exchanges or make the racket feel tiring late in matches. Lighter setups improve maneuverability, though some players lose stability and penetration if they go too light.
This is why blade-rubber pairing matters so much. A medium-fast blade with lively rubbers can outperform a very fast blade with rubbers you cannot control. The numbers on product pages do not tell the full story of feel.
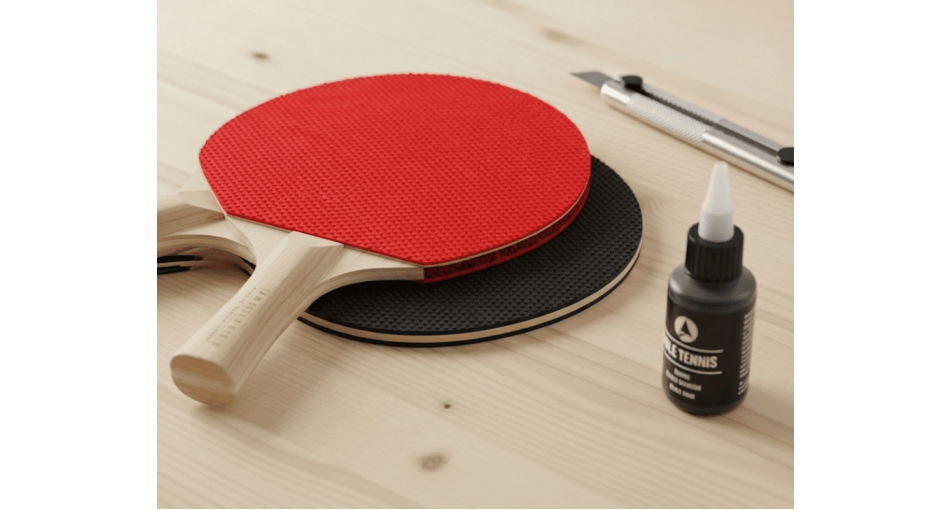
Once you have the parts, assembly is straightforward if you work carefully. You need a blade, two sheets of rubber, table tennis water-based glue, a sponge applicator or brush, scissors or a sharp cutting tool, and a roller or flat object to press the rubber down evenly. Edge tape is optional, but many players like the cleaner finish and added protection.
Avoid rushing the glue stage. Clean, even application makes a difference to bond quality and final finish.
Apply a thin, even layer of glue to one side of the blade and to the sponge side of the first rubber. Let both dry until tacky, not wet. Then align the rubber carefully from the handle area upward and press it down gradually to avoid bubbles. Use a roller or similar flat tool to secure full contact.
After that, trim the excess rubber around the blade shape with controlled cuts. Do not hack at it in one pass. Clean edges look better and reduce the chance of tearing. Repeat the same process on the other side.
If you want edge tape, apply it only after both rubbers are attached and trimmed. It will not protect the blade from every table edge or floor impact, but it can help with minor knocks and gives the racket a finished look.
The biggest one is building for aspiration instead of current level. Fast carbon blade, hard max rubbers, heavy overall weight - it sounds impressive, but many players immediately lose control in the short game and on return.
Another mistake is ignoring compatibility. A high-catapult rubber on both sides of a stiff blade can make touch shots too lively. On the other hand, pairing very dead rubbers with a slow blade can leave you working too hard to finish points.
Players also underestimate maintenance. Even the right racket drops off if the rubbers are dirty, worn, or no longer gripping the ball properly. Clean the topsheets, store the racket in a case, and replace rubbers before performance falls off a cliff.
If you are an improving intermediate player, a five-ply all-wood offensive blade with medium or medium-soft rubbers is often a very strong starting point. If you're a trained looper with solid mechanics, you may be ready for a faster seven-ply or composite blade with harder attacking rubbers. If your backhand is compact and timing-based, you may prefer a lower-weight, quicker-response rubber there even if your forehand setup is more demanding.
That is the real answer to how to build a custom racket: start from your game, choose a blade that gives the right foundation, then add rubbers that complete the picture instead of fighting it. Serious players shopping at specialist stores like TTMode.com usually get the best result when they treat the racket as a system, not a collection of popular products.
A well-built custom racket should make your strengths clearer, your weaknesses more manageable, and your decisions simpler when the score gets tight.